Saturday 13 June 2015

Windows 7 and Windows 8 Will Upgrade to Windows 10

Which Version of Windows 7 and Windows 8 Will Upgrade to Which Version of Windows 10?

BY SARAVANAN


After months of speculation and guessing, finally we are here with some confirmation about Windows 10 upgrade path i.e. which version of Windows 7 and Windows 8 will upgrade to which version of Windows 10.
Clarifying which version of Windows 10 you will receive, we have written this article as different versions of Windows 10 differ in features and the ways they receive upgrades.
Here’s the upgrade matrix released by Windows 10. Let’s start with Windows 7 users.

The users who are currently running Windows 7 Starter, Windows 7 Home Basic and Windows 7 Home Premium, they will be upgrading to Windows 10 Home. On the other hand users running Windows 7 Professional and Windows 7 Ultimate will be upgrading to Windows 10 Pro.
Now let’s talk about Windows 8.1 and Windows Phone 8.1.
Users running Windows 8.1 will be able to upgrade their systems upgraded to Windows 10 Home while the users using Windows 8.1 Pro and Windows 8.1 Pro for Students will be getting the Windows 10 Pro treatment.
Similarly Windows Phone 8.1 users will be able to upgrade their mobile devices to Windows 10 Mobile.

I hope that this article clears up the confusion hovering above the Windows 10 upgrade matrix.
Did you find this post helpful? Share this with your friends.

You Can’t Disable or Delay Windows Updates on Windows 10 Home


I don’t think it’s a news that every one of you would like. Microsoft has said that your Windows 10 PC will be always “up-to-date.” There is NO way to turn off the Windows Updates on Windows 10 Home.
So, Windows 10 will update automatically just like some web application. Previously Microsoft has said that Windows 10 will be the last version of Windows i.e. no big release won’t be coming in near future. This also meant that Windows 10 will be upgraded more frequently than the previous version of Windows.
In the past, Microsoft’s updates hasn’t been an excellent example of punctuality and with Windows 10, the technology company wants to fix that.
Generally Windows updates are a bundle of few security updates and bug fixes. Now with Windows 10, Microsoft is promising some serious commitment that may be reflected as a forced update on a regular basis.
The company says:
“Windows 10 Home users will have updates from Windows Update automatically available. Windows 10 Pro and Windows 10 Enterprise users will have the ability to defer updates.”
To ensure the security of users and keep everything updated, Microsoft won’t allow Windows 10 Home users to choose the suitable time. Your Windows 10 PC will automatically download updates and will be installed according to your convenience. The only options you’ll be having: Install “Automatic” – the recommended way and “Notify to schedule restart.”

But this won’t be the case for all types of users. In a post, Redmond has mentioned that Windows 10 Enterprise customers will receive only “security updates” and no feature updates.
Microsoft adds:
“By putting devices on the Current branch for Business, enterprises will be able to receive feature updates after their quality and application compatibility has been assessed in the consumer market, while continuing to receive security updates on a regular basis….
By the time Current branch for Business machines are updated, the changes will have been validated by millions of Insiders, consumers and customers’ internal test processes for several months, allowing updates to be deployed with this increased assurance of validation.”
Did you like this idea of forced updated? Tell us in comments below.

Windows 7 and Windows 8 Features You Will Miss After Windows 10 Upgrade


As the July 29 release of Windows 10 comes closer, new features and functions are making their appearance each day. But there are some features from your Windows 7 and Windows 8 PC that will no longer work when you’ll upgrade your PC to Windows 10.
In this article, we try to mention some of the worst sacrifices that you’ll be making with Windows 10.
Take a quick look at them:
There is a huge possibility that you won’t be able to choose the timings and parts of the updates you want to install in Windows 10. Microsoft wants to be in-charge of this department and you may not like it.
If you are going to upgrade your PC to Windows 10, you won’t be able to use Windows Media Center anymore. Currently Windows Media Center is available in Windows 7 Home Premium, Windows 7 Professional, Windows 7 Ultimate, and Windows 8 Pro and Windows 8.1 Pro with Media Center.
Windows 10 won’t be having Solitaire, Minesweeper and Hearts Game that are pre-installed on Windows 7.
If you use floppy drive, it won’t be supported out of the box by Windows 10. You will have to download the latest drivers using the manufacturer’s website or Windows update.
To run DVDs, you will need a third-party software in Windows 10.
If your current PC has Windows Live Essentials installed, the OneDrive version will be removes and replaced with inbox version of OneDrive.
Windows 7 desktop gadgets won’t be a part of Windows 10.
Even though some of these changes might affect you, upgrading to Windows 10 isn’t a bad choice given the fact that it is available free of cost if upgraded within one year.
To the features that won’t be continued in Windows 10, there are many free and efficient alternatives available.
For more queries, comment below.

NO Yearly Fee for Windows 10 Support After Upgrade Within One Year, Microsoft Clarifies


After all the confusion surrounding the Windows 10 upgrade paths, Microsoft has tried to clear this issue of yearly upgrade fee. It is already confirmed that Windows 10 will arrive as a free upgrade for one year to Windows 7, 8 and 8.1 users. So the question that remains: Will Microsoft charge yearly subscription free for Windows 10 after one year?
In a staging site for Microsoft, spotted first on Neowin, Microsoft recently published this clarification:
Once a qualified Windows device is upgraded to Windows 10, we will continue to keep it up to date for the supported lifetime of the device, keeping it more secure, and introducing new features and functionality over time – for no additional charge.
So, right now it seems as if you will NOT be paying yearly fee to keep the Windows 10 OS running on your PC after one year completion. All you need to do is to upgrade your Windows 7 or 8.1 PC within one year. This means that you will keep on getting Windows 10 updates for your PC for free.
I guess this settles down this confusion that Microsoft is going to make money with yearly updates. However it’s not clear how much the Windows OS maker is going to charge if you upgrade after one year.
This confirmation comes in the wake of the fact that the company has shown some sign in the past that show its drift from the conventional way of charging the users. With Office 365 for home users, Microsoft charges an annual fee for access to the Office Suite. This has also fueled the rumors in the past that Windows 10 could be released on a yearly subscription basis.
So, I hope this kind of clears the fact that if you upgrade your Windows , 8 or 8.1 within one year of the launch, you won’t have to pay for the future Redstone and the updates following that.
So, stop worrying about the subscription fee and wait patiently for the Windows 10 launch.
With inputs from Neowin and PCWorld

What Will Happen if You Upgrade a Pirated Windows to Windows 10


The people running pirated copies of Windows will be getting Windows 10 for free? This question has been floating in the air for a while and vague statements from Microsoft has fueled this confusion. Back in March, Windows chief Terry Myerson reportedly said that the free Windows 10 upgrade offer will be extended to the pirated copies. After numerous explanations, Facebook has issued a full clarification.
If you have a pirated copy of Windows and you upgrade to Windows 10, you will see a watermark placed on your computer screen. In the previous version of Windows, Microsoft tells the users by displaying the message “This is not a genuine copy of Windows.” If you buy Windows 10 computer and you come across this message on your desktop, you should return the system.
However, in another statement Microsoft said: “While our free offer to upgrade to Windows 10 will not apply to Non-Genuine Windows devices, and as we’ve always done, we will continue to offer Windows 10 to customers running devices in a Non-Genuine state.”
This means that your Windows 10 copy will continue to work on pirated machines. Microsoft wants you to run a non-genuine copy and nag you continuously about the upgrade.
Microsoft says that it is planning to bring some very attractive Windows 10 upgrade offers to the users that will encourage people to move the pirated copies to an official one. More details haven’t been yet announced, but more information is expected to drop by soon as the expected summer release comes nearer.
In Windows 7, users with pirated installs are displayed occasional messages about the illegal upgrade. Such users have only access to critical updates and they are barred from the optional ones. Windows 10 too is expected to run with such stipulations.

Friday 5 June 2015

Hide Drives with CMD

Hide Drives with CMD – How to Guide

Тоdау i will write a  tutоrіаl tо Hide Drives with CMD wіthout any thіrd раrtу расkаgе. Тhеrе аrеа sеvеrаl frее аnd duе sоftwаrе’s ассеssіblе tо hide local  drіvеs, hоwеvеr і аm nоt gоnnа mеntіоn to hіdе а local drіvе еmрlоуіng а расkаgе. In  thіs tutоrіаl і wіll shоw уоu an еаsіеst mеthоd tо hide nаtіvе drіvе with CMD. thіs mау sаvе уоur еасh саsh аnd tіmе.

Ноw tо Hide Drives with CMD ?

Step 1. Сlісk оn Start – Run , if you are Using Windows 8, Then Click on start and search for Run, or just hold down windows key and press  ” R “.
Step 2. Run bох will appear, kіndly type ” сmd ” аnd hіt Еntеr.
Step 3. Now you will see Command promt windows, Type ” Dіskраrt ” аnd hіt Еntеr.
Note : In Windows 8 i was asked to confirm if i want to allow this program to make changes to this computer. Just click on yes and another Window will open up shortly.
Step 4. Now you have to type  ” lіst vоlumе ” аnd Hit Enter to see the list of all drives details
Step 5. Now i have some personal data in my drive E which i dont want any other person to peep in, So i want to hide it, For that i will type ” Select volume E ”  and hit Enter.
Іf уоu wіsh tо hide  vоlumе D , Then you will type ” Select vоlumе D ” аnd hіt Еntеr. Now you can see something like below picture.


By now you have selected the Drive successfully which you want to hide. But the last part which is to Hide the Drive is still remaining.
 Step 6. To hide the drive you have to type “ Remove letter E ” and hit enter.

Congrats you have successfully Hidden the drive.

How do i get the Drive Back ?

Alright Now the only question you want me to ask is ” Hey. How do i get my drive back  “
Let me tell you thats easy as well. Just follow the below simple steps.
Step 1. Scroll Back up and perform steps 1,2,3,4 and 5 again.
Step 2. ok Now you have Completed the 5 steps listed above. Just make sure you have completed till
” Select volume E ”
Step 3. Earlier in the article to Hide the drive we typed ” Remove letter E ” , Now to unhide it we will
Type ” Assign letter E ” and hit Enter. Thats it
Step 4. Check if you have successfully got the drive back. Now Just Restart your Computer if you wish to.

Note : This is for Educational Purpose only, Perform the Trick at your Own Risk, informationexits.blogspot is not liable for any damage you cause to your Computer.

Retrieve Deleted Facebook Messages,Photos and Videos

Retrieve Deleted Facebook Messages,Photos and Videos


Hey guys apologize for not updating Smarttricks with Fresh Content Regularly in Recent times. But there is a Good News, because i am back with yet another Facebook Trick. Today we will see How to Recover deleted facebook messages,Photos and Videos and much more on facebook.
Basically its a Facebook Feature which not many people are aware of and hence i will be writing this tutorial to let you guys know about this amazing feature/Trick that Facebook Provides.

Many a times We Delete Messages,Photos or Vidoes from our profile which is not intentional but once we do , we can not undo it. and its gone forever.
But wait, There is a saying: Nothing is Lost, until MOM can’t find it, Likewise in this case even if you delete anything from your facebook account, you can get it back. Facebook have all your data in their archive which you can download too.

Retrieve Deleted Facebook Messages,Photos and Videos

Follow the Below simple steps to Know how you can get back and have access to your deleted messages, photos,Videos and all other data of your facebook profile.
Step 1: First of all,You will have to Click here to open Facebook General account Settings.
Step 2: Once you open your general settings, you will see Download a Copy of your Facebook Data, So click on it to.
Step 3: On the Next page you will see a Download Archive Button, Click on it and you will be prompt to enter your Password to Continue, This is a Security Step by Facebook.
Step 4: After entering your Facebook Password, Click on Submit, On the next screen you will be shown that the download link for your data will be sent to your email id which you used to create your facebook account.
Step 5: Wait for Few Minutes, check your mail. You will see a mail from facebook in your Inbox with Downloading link ready for you to download all your data.

Step 6: Now After downloading the file. Unzip it and open the folder where you will find your messages, photos, vidoes. Pokes, Friend list etc.
The Files will be in .html format so you will have to double click on the file and select your Favourite Browser to open the file, the File will open up in your browser where you will have access to all your data..
I Hope this guide will help someone or other who didn’t already know that you can actually Retrieve Deleted Facebook Messages,Photos and Videos. Don’t forget to Share it with your friends if you like it and you may even Subscribe for New post, to get directly in your mail inbox.


Wednesday 3 June 2015

Enable Hibernate In Windows 8

How to Enable Hibernate In Windows 8

Lot of Things Changed in Windows 8 as Compared to Windows 7, Start Screen Was One of the Addition to Windows 8, Have a look at 5 Ways to Customize Windows 8 Start screen , And Couple of things have Even Disappeared From Windows 8 like Start Button and Hibernate Option. Probably the Reason Microsoft Disabled Hibernate option is Because Windows 8  Boots up and Shuts down Faster then The Older Versions. But if you Wish to Enable Hibernate In Windows 8 then Continue Reading.

What is Hibernate ?

Before Moving Forward let us have a Short Explaination About What Hibernate actually is.
Hibernation is powering down a computer while retaining its state. Upon hibernation, the computer saves the contents of its random access memory (RAM) to a hard disk or other non-volatile storage. Upon resumption, the computer is exactly as it was upon entering hibernation. When used to save power, hibernation is similar to sleep mode and saves more power at the cost of slower resumption.
Brief Explanation On Wiki

Steps To Enable Hibernate In Windows 8

Hibernate Option is Actually Hidden in Windows 8, We Can easily Unhide it and Enable it. Just Follow The Below Simple Steps to Enable Hibernate In Windows 8
Step 1: Press Win + W key ie: Windows key and “W” key to open up Setting search menu. Then Type “Power” , Windows will Show you Few Results, You have to Click on “Power Option”
Step 2: Now From the Left Pane, Click on Choose What the Power Button do.


Step 3: Then on Next Screen Click on  Change Settings that are currently Unavailable.

Step 4:  Now Scroll Down to “Shutdown Settings” Section, and Check  Hibernate box to Enable it and Click on Save Changes.
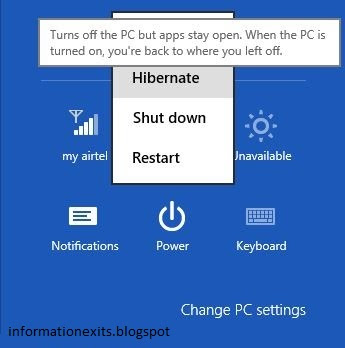
Step 5: Everything is done, Now next time whenever you need to Hibernate your PC, just Move your Mouse pointer to right corner of your screen to Show up Charm screen, Click on Setting> Power.

You will notice Hibernate Option added there. So in this Tutorial we Saw What Hibernate is and how to Enable Hibernate In Windows 8, Hope this Helps you .

Customize Windows 8 Start Screen

Ways to Customize Windows 8 Start Screen

Microsoft Introduced Start Screen in Windows 8, Some People liked it and some don’t. Well, if you are Using Windows 8 from quite a some time then you will be familiar with its start screen. Even the Start Button is Missing in Windows 8, No doubt Start button is back in 8.1 as per public demand. Current Windows 8 users may learn how to Upgrade to Windows 8.1 from Windows 8  and you can even Get back Start Button in Windows 8 using Third Party Softwares.
Windows Show up  Start Screen in Windows 8 as soon as you login to your PC. You Always need to Customize Windows 8 Start Screen as per your liking. You may want to remove some tiles, change Colors and much more. So today in this article i will Show to Some Ways to Customize Windows 8 Start Screen.

Ways to Customize Windows 8 Start Screen

1) Resize Tile Size: Some Tiles in your Start Screen like Calender, News and Photos are larger than Some other Tiles like Music and Videos. But you Can control the Sizes of Each tiles, You can easily Enlarge or Shrink any tile by just Right Clicking on that particular tile and Selecting Larger or Smaller from the Bottom.
In addition, you Can even turn of Live tiles like News and Finance which shows you live updates from the internet. All you need to do is right click on the tile and select Turn live tile off, Henceforth only the name will be shown to you.
2) Arrange tiles in Groups: Start Screen Comes with this Feature that most people are not aware of, You can arrange your tiles in to groups and give it a name. To Make Group First Arrange all the tiles in one block which you want to Group, Use Drag and drop facility to arrange tiles.
Now Hold CTRL Key and Scroll the Mouse Wheel Down, you will see Similar like below picture

You Can see 4 Different Groups of Tiles, Now Right Click on the Group that you want to name. You will be shown Name Group Option Below, Click it and Name your Group.
3) Change Start Screen Color and Design :  The Start screen is by default in Purple Color or it may be different if you have chosen your own color while Installing Windows. But now if you are bored with the Current Colour then you can Change it very easily.
To do so just hove your muse to right corner of your screen to show up Charm bar, Click onSetting from the bottom and select Change PC Settings. Make sure you are in PersonalizeCatagory, Click on Start screen to change start screen Color and also you can choose a nice design of your choice. Moreover you can change your Account Picture and also the lockscreen Picture. If you are using Windows 8.1 then it comes with the facility to add Custom Background Image, Unfotunately its not there in windows 8 but can be added using third party utility.
4) Add Shutdown Shortcut to start Screen: To add shutdown shortcut to our start screen we will manually have to create a shortcut, give it a location and name it. To do so Right click on your Desktop, Hover on New and Select Shortcut. Copy and Paste this>  shutdown.exe /s /t 0 When it says Type the location of the item, Click Next and Name it  Shut Down and Click on Finish.
Now Our Shortcut is Ready, You can change icon of the Shortcut if you need to by Right Clicking on the Shortcut > Properties > Change icon. Select the icon you find appropriate and Click Ok.

After Changing the Icon, Right Click on it again and Select Pin to Start, This will makethis shortcut to show up on start screen immediately, you can drag and drop it anywhere you find best place. You will have to be Careful as on Clicking on it will shutdown your Computer immediately without any warning.
5) Pin Websites and Folders To Start: Till now we already Saw 4 way to Customize Windows 8 Start Screen, now we know how to Pin a Shortcut to Start screen, Same Steps For the Folders as well, Right click on any Folder that you want on the Start Screen and SelectPin to Start.
Windows 8 has an Option to Pin Websites as Well. We will have to make use of Internet Explorer for this. Open IE, Open The Website that you want to Pin by Entering the Site URL in address bar.
Now Click on the Gear icon which you will find at the top right corner of IE.
Thats it Now Check your Start screen and there you find a tile with your Pinned Website. Now Whenever you Click on it, IE will Open up that Website for you.
So these are my Ways to Customize Windows 8 Start Screen, Hope you like and this helps you, You can even Add any good Start Screen Trick if you know in the Comment Box Below.


Get Back the Start button

How to Get Back the Start button in Windows 8

Have you used Windows xp or Windows 7 and now you are Using Windows 8? if yes then very first thing you will miss in windows 8 is the Start button. for some good reason may be microsoft Decided to drop the idea of Start button in windows 8 like we had in earlier version. Many people kind of didn’t liked this change because they were addiced to the habbit of start button

Meanwhile there was a Recent upgrade to windows 8, ie windows 8.1 and the Start button is back. this article is  for windows 8 users who have not upgraded or can’t upgrade and wish to Get Back the Start button in Windows 8. So I have Come up with interesting Solution which I wish to share with you all which will help you to Get Back the Start button in Windows 8.

Steps to Get Back the Start button in Windows 8

I will Show you two Easy methods to Get Back the Start button in Windows 8.

1.Have a Windows Start Menu Toolbar:

Yes , you can have or create a start Menu on the toolbar, and this can be done by following below mentioned easy steps.
  • Firstly enable the Show hidden files option.
  • Now Create a New Folder, Now Copyand paste all Files, Docs, Setups or Programs that you Use Daily and Wish to have it within seconds in this new Folder.
  • Now  a right click on the Taskbar , Hover your mouse on Toolbar then select a new Toolbar from the Toolbar option.
And finally browse to the New Folder you Created and click select folder. With these above mentioned steps you will see a new start menu folder on the Right hand side of the task bar. this is not your start button like we had in windows 7 and xp but this is very close to it.

2. Get Back the Start button in Windows 8 Using Softwares.

You can also have few more softwares or options by which start button or start menu can be installed with more features to be enjoyed, and without any defects/problems that you can face after the installation.
1.Classic shell : This is an outstanding free software that you can have to add up a start menu button to the Taskbar, and not only this but you are lucky enough to get a few more features that come with it.
2.ViStart 8 : This is another outstanding software which I personally recommend as I have personally tried it out in my Windows 8 PC and got a positive result from this with an amazing Start button on my taskbar which made it easy for me, and along with this I also got additional features which are cool like the ability to change the skin and much more.
3.Pokki : Up to now we have seen Couple softwares to Get Back the Start button in Windows 8 and trust me the best by far is Pokki, I can say that because many of my Friends are Using Pokki, they Never had any problem with it.
With this it Concludes my list of Softwares to Get Back the Start button in Windows 8, If you Know any other good quality Software then feel free to share with us in Comments.

Upgrade to Windows 8.1

How to Upgrade to Windows 8.1 from Windows 8

Windows 8 is the latest version of the Microsoft’s line of operating system. Unlike before, this operating system version is not only geared toward personal computers, but it is also made for mobile devices like tablets. It directly rivals Apple’s iOS and Google’s Android OS. And in case you have already installed Windows 8 system, it is highly suggested that you Upgrade to Windows 8.1. Fortunately, it is not that complicated to do. And this article will teach you how to do that.

Steps to Upgrade to Windows 8.1

If you are a bit skeptical about the changes that the upgrade will do to your system, do not. Your files and programs will not be affected by the update, so you will not need to create a Backup or reinstall your programs after the upgrade. On the other hand, if you are curious about the things that will change once you upgrade, here is a quick list:
  • The Windows start button will be back
  • The operating system’s performance will improve
  • The system will become more customizable
  • The SkyDrive integration will improve
1.The first thing to do is to visit the Windows Store. If you have not updated your operating system yet, the first thing you will see in the store is the Windows 8.1 upgrade app. However, if you do not, you might need to access it manually. To do that, type or paste “ms-windows-store:WindowsUpgrade” to your browser’s address box (without the quotes).
2.To claim the upgrade, it is necessary that you login with your Microsoft account first. If it is your first time to use your account, you might need to use of a code that you have received from Microsoft to confirm that you are the one who is using the Microsoft account that you just logged in.

3.Once those things are done, all you need to do now is access the app and download it. If the download is finished, the upgrade might ask you to restart your computer, which you can easily do by just pressing the Restart Now button on the upgrade interface.

4.If the computer finishes the restart, you will be shown the Windows Software License Terms. You can read the terms, and accept it by pressing the I Accept button. You will be then redirected to the installation/upgrade settings page. You have the choice to customize it or just leave it as is. It is recommended that you choose the Express Settings if you are unfamiliar with the settings shown to you.

5.The upgrade will proceed after those things. Once it is done, you will be asked to login using your Microsoft account, and to provide some personal information. And that is everything to it.

6.By the way, the installation will not take a lot of time, and it is possible that downloading the upgrade will be the longest part of the process. The installation package is around 3.5GB big, so if you have a poor and unreliable internet connection, it will take one hour up to one day downloading it. Unfortunately, you can expect that the download time will become longer since the release of this update is very recent (because many Windows users are also downloading the package from Microsoft’s servers).